I'm on a year long journey to cook something each week that I've never cooked before.

Wednesday, March 30, 2011

Week 13: Meat! - Shooter Sandwich

The internet is a great font of ideas.  Most of them are rubbish, but sometimes a gem comes through.  I was surfing one of my favorite sites and came across the recipe for a sandwich that sounded crazy and delicious; the Shooter.

Not only did the site have directions for how to make it, but it had beautiful step by step pictures as well.  How could I go wrong?

As usual I went overboard to get the best ingredients I could.  If I'm going to make it, I'm going to make it the best I can.  That way if it's fantastic I can try pulling back a bit and seeing if it's still good, and if I don't like it then there's a good chance that it wont get better with worse ingredients and I can leave it be.

I went to the butcher at the Pike Place Market and got two lovely rib eye steaks.  They looked so good I almost felt bad that I was going to put them in a sandwich... almost.  While I was there I got some shallots and mushrooms at one of the vegetable stands.  I opted to stick to the recipe and use standard white mushrooms rather than branch out for more flavorful brands.  I figured the meat didn't need any competition.

I made my own bread to start with. I'm starting to dial in on the proper way to make it.  I've been trying to nail down their "scoop and sweep" method for measuring flour, but my dough always ends up too thick, so I know it's not working well.  I need to figure out the proper weight of flour (ala Alton.)  You can't go much wrong measuring by weight. This time, though, it worked pretty well.  My bread did not end up as dense as it often is.  Besides, you have to scoop it out!  The biggest problem is that the bread wasn't big enough.  Next time I'd do it a bit bigger.


I cooked the shallots and mushrooms with three cloves of garlic in about 2 TBS of butter.  I cooked them until there wasn't much extra liquid left in the pan, but not until they were sticking to it.  It takes a while, so patience is key.

Then I cooked the steaks.  Normally I use a combination stovetop/oven method to cook steaks, but here I wasn't going to be as picky.  The recipe just calls for stovetop, so I did that.


The picture doesn't do much justice to the process, but the next one is great.  Once the steaks were done, I put one of them in the hollowed out bread, straight from the pan.


I spooned on the mushrooms and shallots.


Added THE SECOND STEAK!  Sorry... any recipe with TWO steaks gets me a bit excited.  I put creamy horseradish sauce on and some brown mustard in the top. It didn't fit very well, so I had to trim a few pieces off. I disposed of them properly.


Then I sealed the whole thing up in wax paper and aluminum foil.


I put it in the cupboard and put a breadboard, several heavy glass pans, and two sacks of flower on top of it as a press.  Then I left it over night.  This is the part of the recipe that somewhat worries me.  Leaving cooked meat out over night seems dangerous to someone brought up to fear germs.  Still, it was wrapped up in three layers of wax paper and two of foil, so probably no harm.

The next day I pulled it out and cut it up.


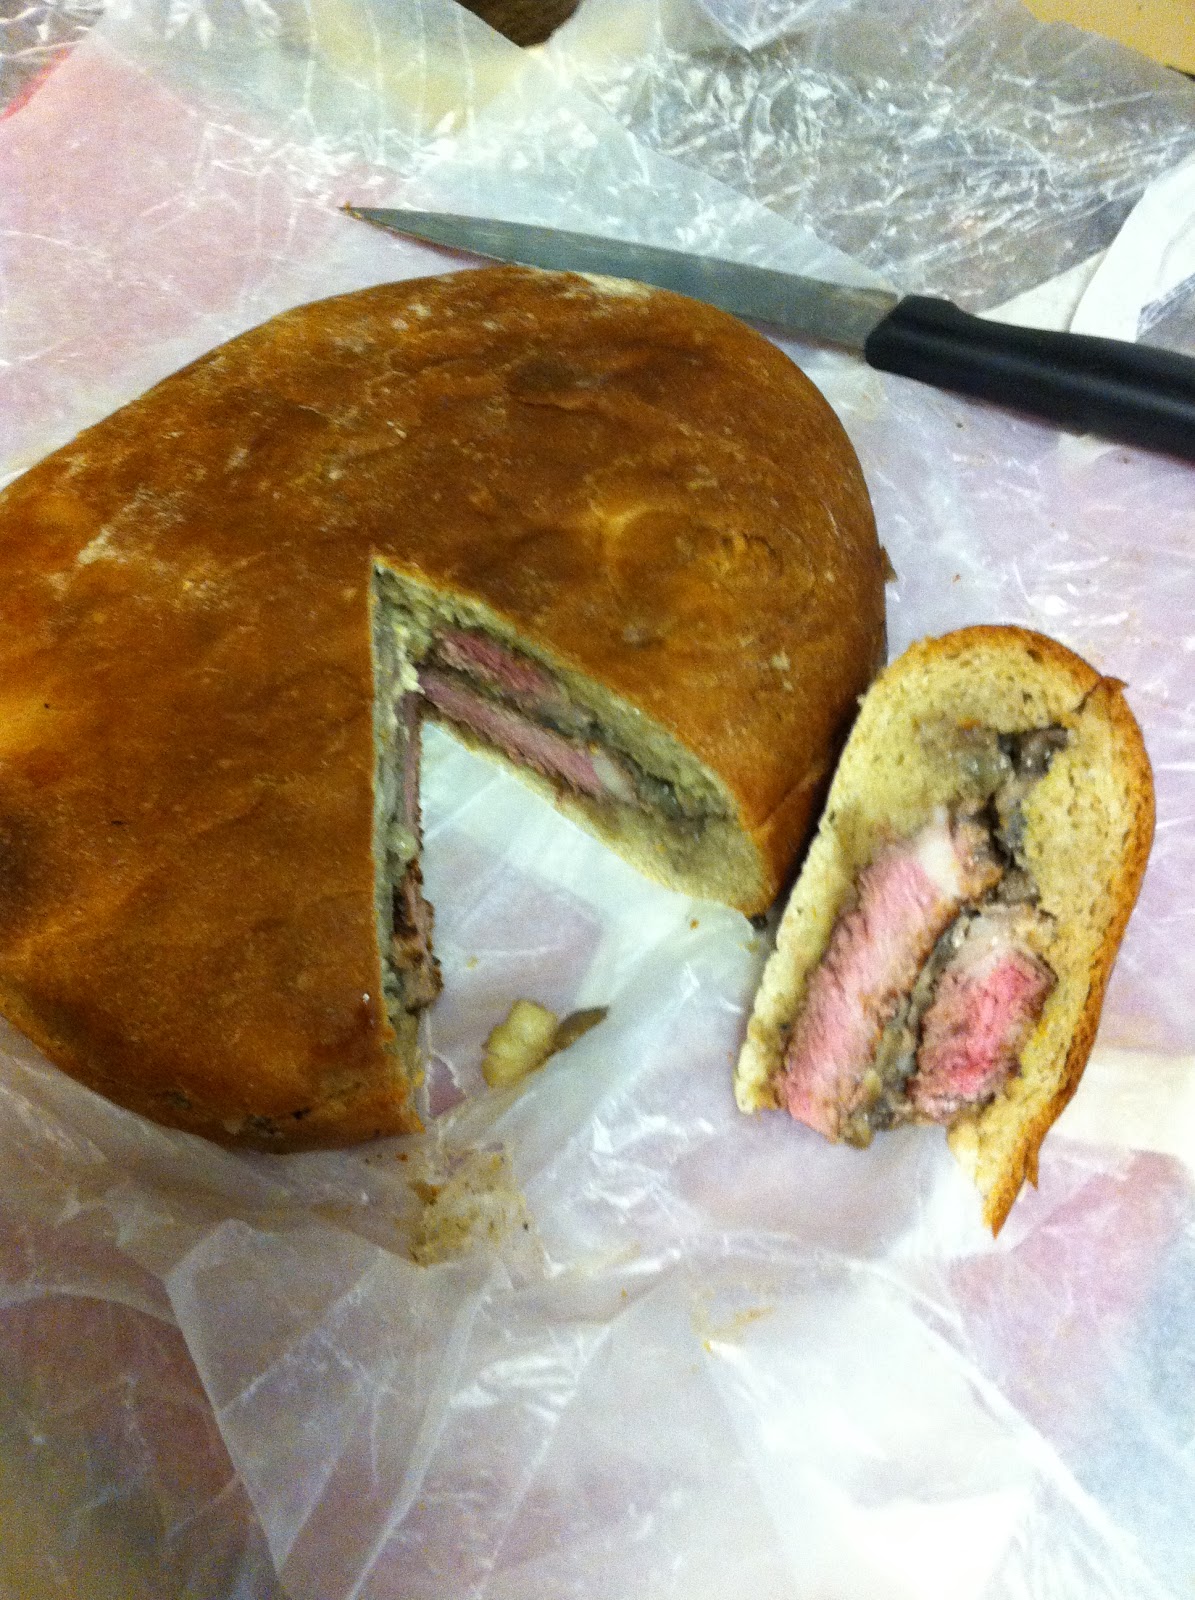
Results:  Honestly, I wasn't that impressed.  Each of the parts tasted great on their own, but they just didn't come together for me.  It could easily be a problem with the ratios of bread to steak to filling, and I might try again with more steak per bite and more horseradish.  It might have been the bread, too.  The middle pieces I pulled out were tasty enough, but I don't think my oven was cooking hot enough and I'm not sure this was the perfect bread for this sandwich.  I may just get a loaf of good bread from a good bakery if I try again.

Overall I'm left with a feeling like I should have just eaten the steaks with the mushrooms and shallots on the side and bread with butter instead of going to all this trouble.

Oh, well.. they can't all work out perfectly. :)

Sunday, March 20, 2011

Week 12: Naan Better! - Naan Bread

This week is a quick one.  I just got back from vacation and didn't have my usual time to research and shop.  However, I've had an desire since I made Butter Chicken to make some Naan Bread to go with it.  We already had dinner plans for the evening, however, so I wouldn't be making the chicken, just the bread.

For my research this time, I turned to my trusty Artisan Bread in Five Minutes a Day book, which just happens to have a recipe!  Really, though, it has more of a "method."  Traditional Naan is cooked on the inside of a tandoori oven, which i don't happen to own.  Artisan Bread, however, suggests using a cast iron skillet.  I've needed a new one of those for a while, so I didn't mind buying one!

The recipe starts by using one of their standard doughs.  I approve of this since it makes a ton of dough and I can go through the whole week baking loaves, whether or not this works out.  It might be better to find a specific dough recipe, but this will work for an experiment like this.

The only ingredient I didn't have was ghee.  It's a clarified butter used in Indian Cooking.  In fact, it was recommended for Butter Chicken, but I didn't manage to find any.  This time, though, I found some at the local Indian grocery.  It wasn't in the dairy section.  It was on a shelf.  Apparently clarified butter doesn't need refrigeration.  


I used the standard "boule" recipe from the book.

3 cups warm water
1.5 TBS yeast
1.5 TBS Kosher salt
6.5 cups flour

Mix it and let it sit for two hours.  Then tear off a chunk.


I rolled it out to about 1/8th inch thick and set the cast iron skillet on the stove on high.


I added the ghee to the pan, spread it out, and then tossed in the dough.  I turned the stove down to medium, and covered it to keep the steam and heat in and let it cook for about 3 minutes before flipping it.


Then I cooked it on the other side until the edges were all done.  It was about another 3.5 minutes.

Tada!


It sure looks like naan!

Results:  Mediocre.  Don't get me wrong, the bread was tasty, but I wouldn't call it "naan."  It was more like an unsweetened pancake, or something.  There were hints of the correct flavor and texture, but not enough.

I think the big problem was probably the dough.  It's bread dough and so I got bread with some ghee flavoring.  I need to track down an actual naan recipe and see if there is a difference.  It might also have been a bit thick, but not by much.

On the plus side I now have enough dough for several good loaves!

Sunday, March 13, 2011

Week 11: Candyland 2: The Revenge - Popcorn Cake!

It's been a busy week, sandwiched between two trips out of town, so I decided to do something fun and new if not terribly ambitious.  While wandering through the interwebs I happened upon the perfect thing, a Popcorn Cake!

Honestly, I'm not sure what to say about the process.  I used Pop Secret Butter popcorn and got a great yield from the two bags.  I noticed while making it that it says right on the bag "Do not use the 'popcorn' button on your microwave."  I was amused, but followed the advice and it worked perfectly.  No more "popcorn" button for me!


I added the M&Ms and pretzel sticks.


I melted the butter, added in the marshmallows and cooked it until it was one delicious mass.


I mixed it all together.  You really have to make sure you get it mixed well.  Pockets of molten marshmallow like to hide on the bottom.

I didn't use a bunt cake pan since I don't have one and didn't want to buy one just for this.  I just spread it out like rice crispy treats, and left it to cool.


Verdict:  Delicious, of course.  It was like a giant popcorn ball!  I liked the addition of chocolate and pretzels as well.  It gives it a good variety of flavors and textures, especially because the popcorn tends to soften.  The M&Ms are little bursts of surprise flavor as you chew.

If I ever do it again I'll use a different kind of popcorn, though.  This one was fine, but I'd prefer it to be even saltier to contrast with the sweet more.  Maybe I'll use leftover popcorn from the movie theater!

Sunday, March 6, 2011

Week 10: Candyland - Caramels

It's a busy time for me, so I'm sitting back a bit and trying some of the "easier" recipes I've been wanting to do.  With that in mind my latest creation was making caramels from scratch.  I love caramels, even cheap ones, but I especially love buttery, expensive caramels.  They really aren't that difficult to make yourself, but they do have a couple of pitfalls to watch out for.

I didn't have to do much research because I'd already seen a recipe for caramels on a food blog I like to follow; Not So Humble Pie.  A Seattle based mom who makes food so delicious looking and decadent, it's like food porn.  You should go check it out.  There's always something good.

In any case, she made caramels from scratch and gave very precise instructions including how to avoid common problems.  Her recipe is fairly simple, but time consuming.

First up, was getting a new thermometer.  I have a candy thermometer, but it's old and I'm not sure how good it really is, so I decided to upgrade to a fancier one.  I bought one at Sur Le Table at Pike Place.  It's horrible.  I mean, it works, but not very well.  You have to try to get as much of the stem in whatever you want to measure as you can to get an accurate reading, which means holding it in your hand at an angle and waiting for it to climb to the correct temperature.  Bleah.  I'll have to investigate some others for next time.

The only difficult item in the recipe was the heavy cream.  You can get it at any grocery, but not if you want the really heartstoppingly bad for you variety she suggests.  And even that wasn't too bad since there's a dairy outlet in Pike Place.  They had several brands to choose from with ~40% fat content.  I went with the cheapest, and it worked great.

I decided since this was my first batch, I wasn't going to make salted caramels.  I wanted to see what they are like on their own, first.

I did exactly as the recipe said.  I mixed the sugar, karo (prevents sugar from recrystallizing,) salt, and half of the cream.  I brought it to a boil, stirring constantly, and it did take a while.  About 10 minutes as I recall.


I didn't really let the boil get going and that might have been a mistake.  Everything turned out in the end, but it took a lot longer than is should of.  Every time I added some of the cold cream the temperature dropped below boiling and so I had to wait until it climbed back up again.  So it was; pour, wait, pour, wait.  Eventually it got it all in and the mix didn't seem the worse for dancing on the edge of boiling the whole time.

The butter went in well, but took some stirring to incorporate properly. Then I let the whole thing boil.  This is where the new thermometer really blew.  I'd check the temp every five minutes or so, and it would take at least two more minutes to get a good reading.  In the end I really had to go with my gut.  You can kind of tell by watching when it's getting close because it starts looking a lot like caramel.  It took about 45 minutes for me, but my old stove was dying on me, so who knows how long a real stove would take.  I would trust her recipe.


I ended up using an 8 by 13 pan instead of 9 by 9.  So the caramels are slightly thinner, but that's fine.  I didn't coat the entire bottom with paper and didn't do a very thorough job buttering the paper.  Those were both mistakes and unless you like eating paper or scraping caramel out of a pan, learn from them.


Result: AMAZING.  These little balls of joy are so good.  Rich, buttery, but with a really great caramel taste. They are like candy crack to me.  I want to eat them all.  I scraped the cooking pan clean (not when I poured) and chewed off the leavings on the spatula.  I will definitely be making these again, much to my waistline's chagrin.